
This past winter (2015-2016) I decided to make a dining table for our new house. The good news is I got to make it exactly how Sarah and I wanted. It is all hardwood and I got to learn a ton making it. It also gave me an excuse to buy some new tools. The bad news is it was slow going and it wasn't cheaper than buying a table from a store. I don't care, it has been a labor of love. Below is documentation of the build. About halfway through I stopped logging consistently but I did take pictures.
The Proverbial Specs and Finished Product Pictures
Dimensions: 42" x 84", 30" tall
Top: Walnut, 8 1x6s butt joined
Breadboard: Hard White Maple
Legs: Red Oak, 4 1x4s glued, cut to exactly 3x3, then tapered from 3" to 1.5"
Apron: Red Oak, 2 1x3s glued
The Play-By-Play
(01/04/2016) I picked up the S4S walnut lumber tonight from
Owl Hardwood Lumber. Dad (and Mom) met me at Owl, we loaded it in Dad's car, and drove it to my house. All total I bought 8 S4S 1" x 6" x 8' boards (64bdft) at $5.55 per board foot. I cut up some scrap 2x6s and heavy duty paper rolls to properly sticker the boards. Here is hoping the boards acclimate in the basement and don't warp much. The temperature is approximately 63F and 35-40% relative humidity in the basement.
 |
| Boards "stickered" to allow air to circulate evenly around all sides of the boards |
(01/10/2016) The painstaking and tedious task of edge gluing or butt joining the 1x6s started today. I laid out the boards and picked the orientation I wanted.
The dark areas above are from me dumping mineral spirits on the boards to try and get a feel for how the gnarly grain on the two boards would look after applying a finish. The spots got pretty dark and the basement lighting is terrible but at the right angle the funky gain pattern looks nice. We shall see how the finish looks in better light
The work table the boards are laid on is made from a 4x8 sheet of particle board covered with melamine, two saw horses, and two 2x4s screwed length wise across the particle board to minimize sagging.
How to join the boards took me a while to figure out. The glue doesn't set instantly but the set timeline doesn't allow for much fidgeting. I wound up with 7 cauls, 14 clamps for the cauls, and 6 pipe clamps. Thanks to Jon for letting me borrow some clamps, I didn't have 14 at the ready. In order to get comfortable and speedy with the process, I dry ran a glue-up without the glue. That proved very useful. Placement of the cauls, clamps, and the direction of the pipe clamps was important. It also became obvious I needed Sarah's help to work quickly enough.
Two key points I figured out while doing the first glue-up. Putting packing tap on the surface of the cauls is important to keep the cauls from getting glued to the boards and painters tape along the edges works really well at keeping squeeze-outs from making a mess of the boards. When I removed the painters tape it didn't leave a residue and only lightly raised the grain.
 |
| Edges tapped. Will definitely do again. |
 |
| Glue-up from the side. There was no support in the middle so the boards sagged. I later added support. |
 |
| Glue-up straight on. |
 (01/24/2016)
 There has been a good amount of activity. The whole top is glued up! I learned a few things along the way. I started the glue-up using standard PVA wood glue. When I started the second round of glue-ups I found the glue was setting up too quickly for me to work with. Even with Sarah helping and dry-running the process I had to frantically tear apart a joint when it was way out of flush. At this point some google-fu convinced me to switch to polyurethane (Gorilla) glue. This switch helped a lot in terms of working time with the glue up. To make sure the glue took a nice and long time to set, I didn't moisten the edges. The basement was also nice and dry, 30% humidity, since this is the dead of winter.
The switch in glue did present a few new problems. The tape didn't work as well at controlling squeeze-out as it did with wood glue. It
did help, but I did get a little bit of glue seeping below the tape. The glue also kept getting on my hands and ending up on the boards wherever I pressed my fingers during the glue up. Another PITA, I had to wait until the glue was completely set before scraping off the squeeze-out. Trying to scrape it off before it set made a sticky mess. The actual removal was also much harder since I was now waiting for the glue to completely set. It was incredibly hard to scrap off.
 |
| First Glue-up Using Gorilla Glue |
 |
| Entire Tabletop Glue-up |
 |
| Entire Tabletop Glue-up |
(February) I decided I wanted something unique for the table. After all, Sarah and I get to call all the shots. After disagreeing on a light colored maple base Sarah and I both agreed Maple breadboard ends would offer a bit of interesting contrast. I also happen to be a sucker for nicely figured Maple. I read up on breadboard ends and decided to take a simple route - a mortise and tenon joint using a router bit. Being new and nervous to more sophisticated joinery I decided to take it simple and glue the joint in the middle instead of dowels and channels.
Routing the ends of the walnut top was nerve racking. Using the router table, a makeshift fence, and the help of Jon I was able to successfully route a tenon into the edges of the table and a mortise into the maple breadboard ends. The only thing I really regret on the table came next. I messed up gluing the middle of the mortise and tenon joint twice in a row. I dry-fit the joints and everything lined up really well. While gluing the joints I put too much glue in the middle of the breadboards. When I tried to use my mallet to tap the ends flush the glue got in the way. I didn't have clamps long enough to span the table and couldn't apply enough pressure to squeeze the glue out and ended up with a small gap between the top and the breadboards. Somewhere along the lines of 1/64" to 1/32". A bummer but my only real regret. Lesson learned for next time!
 |
| Router bit installed and fence setup |
 |
| The tenon done. This really made me sweat. |
 |
| Mortise and tenon. Perfect mates. . . except for the glue. |
 |
| All glued up. |
 |
| Closeup of the joint on the finished table. |
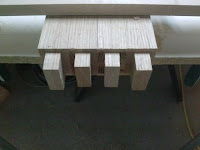
(March) Five 1x2 red oak cross beams were attached to and run perpendicular to the table top boards for support. Slots were drilled into the beams and screws with washers were run through the the middle of the slots and into the table top. This should make for a secure attachment that allows for seasonal wood movement. I missed getting pictures of this but it isn't all that exciting. In the design, these cross beams fit very snug inside the apron, spanning the entire inner width of the apron and keep the top in place in the apron.
The legs and apron are made of red oak. Each leg is made of 4 1x4 red oak boards laminated together. Laminating boards together was significantly cheaper than buying 4x4 oak. I cut the laminated 4x4s to a true 3x3. To make the legs look less chunky I added a taper to the legs by using a taper jig on the table saw. They start at 3" and end at 1.5".
The apron is made from 1x3s laminated to 2x3s. The apron and legs are attached using mortise and tenon joints.


The joints were made with a plunge router, chisels, and a good amount of sanding. After dry fitting the joints, I used gorilla glue to permanently attach the joints.
 |
| Dry Fitting the Joints |
The mortise and tenon joints are solid but I decided to add more reinforcement using kerf mount corner brackets.
 |
| Kerf Mount Corner Brackets |
Attaching the lag bolts took a little bit of thought. Note to future self, thread two nuts on to the machine thread, tighten them very tightly against each other, and turn the outside nut to drive the lag bolt.
 |
| Tighten the inside nut against the outside nut |
 |
| With the two bolts tight against each other, drive the lag bolt into the leg |
(April) Finishing always takes longer than I anticipate. Often it takes longer than everything else. I decided to go for a mirror finish on the top which guaranteed a ton of work. Beginning in March and through all of April I spent a lot of time applying, waiting, sanding (oh so much sanding), cleaning, and repeating.
First up is the easy part. The legs and apron got two coats of General Finishes Java Gel Polyurethane. It was a cinch to apply on the vertical surfaces as it doesn't really drip and it didn't stink up the house as much as a regular polyurethane finish.
The top was a real endeavor. The final ROS pass on the top was 220. After that I applied four coats of pure tung oil spaced out a few days to a week in between coats.
Woodcraft carries the real deal. Note to future self, pure tung oil is really thick and has a pleasant nutty smell that is not at all like mineral spirits. After letting the tung oil dry for a week, I switched to
Waterlox Original Gloss. This particular product is a phenolic resin oil varnish that claims to have a tung oil base. Prior to using this stuff, I had only used polyurethane based varnishes. I spent a ton of time researching finishes and my google-fu told me that I wanted an oil based finish to highlight the figure of the wood and that a phenolic resin based varnish like Waterlox rubs out easier and better than poly. A ton of people rave out the stuff too. At 35 dollars a pop for a quart it better be great.
I didn't fill the grain with anything. I made test samples on the underside of the table and on each sample where I tried to fill the grain by wet sanding with oil or varnish I didn't like the outcome. As a result, I had to put on a ton of coats of Waterlox to fill the grain and build up enough thickness to level the finish. In total I think I applied five or six coats. I don't quite remember, it all blurred together. Each coat got approximately a week of rest before the next although I think I rushed one of the earlier coats because I was getting antsy.
The first two or three coats were rough sanded with the ROS at 320 grit. I then moved to wet sanding with 400 and 800 grit. The final coat that was going to be rubbed out got an initial 800 grit wet sand, than a 2000 grit wet sand, and then I moved to automotive polishing compounds and a random orbital buffer.
Lesson learned, not all compounds are good for rubbing out. Not knowing any better I started with Meguiars M9 Mirror Glaze. Apparently, the abrasive in this stuff breaks down. This means that the abrasive particles shrink while being worked and polishes of this sort are referred to as diminishing abrasives. It should be worked until it completely breaks down for the best result. Once it breaks down, you can rub all you want but it won't do anything more for you. I had terrible luck with the stuff and it seemed to leave an oil residue that would eventually dry and become hazy.
After being disappointed and doing some research, I decided to try Meguiars M105 & M205 which are "super micro abrasive" or SMAT polishing compounds. They don't break down and have very small abrasives that cut quickly but very finely. The results were much better.
In the end, the Waterlox finish looks great. It is the best finish I've had to date. I guess it was worth the 70 dollars. I am really happy with how the table turned out. The finish really brings out the walnut figure, the table is sturdy, and the design should accommodate wood movement. There is one regret which I won't write down but a lesson was definitely learned that won't be forgotten.

 This past winter (2015-2016) I decided to make a dining table for our new house. The good news is I got to make it exactly how Sarah and I wanted. It is all hardwood and I got to learn a ton making it. It also gave me an excuse to buy some new tools. The bad news is it was slow going and it wasn't cheaper than buying a table from a store. I don't care, it has been a labor of love. Below is documentation of the build. About halfway through I stopped logging consistently but I did take pictures.


 (01/24/2016) There has been a good amount of activity. The whole top is glued up! I learned a few things along the way. I started the glue-up using standard PVA wood glue. When I started the second round of glue-ups I found the glue was setting up too quickly for me to work with. Even with Sarah helping and dry-running the process I had to frantically tear apart a joint when it was way out of flush. At this point some google-fu convinced me to switch to polyurethane (Gorilla) glue. This switch helped a lot in terms of working time with the glue up. To make sure the glue took a nice and long time to set, I didn't moisten the edges. The basement was also nice and dry, 30% humidity, since this is the dead of winter.


No comments:
Post a Comment